Flood worries? Forget ’em! Get your replacement and Sump Pump Installation up and running in a flash.
Who needs next week’s appointment when you can have a working pump today? This quick-and-easy guide empowers you to swap out your primary Sump Pump Installation like a champ, saving you valuable time (and maybe some plumber-related headaches). Grab your toolkit, channel your inner handyman, and say goodbye to basement blues in just 60 minutes.
The manual is your treasure trove of knowledge! It holds the keys to understanding your pump’s parts, installation process, and even compatible accessories.”
Investing a few minutes upfront with the manual saves you hours of frustration down the line. It’s like having a friendly expert whispering guidance in your ear every step of the way
Before Installing Your Pump:
1 Cut off the electricity.
2 Verify the outlet’s height and distance.
3 Avoid using extension cords at all times.
4 Make use of a dedicated circuit
5 Never take off the tags.
6 Avoid using the pump dry.
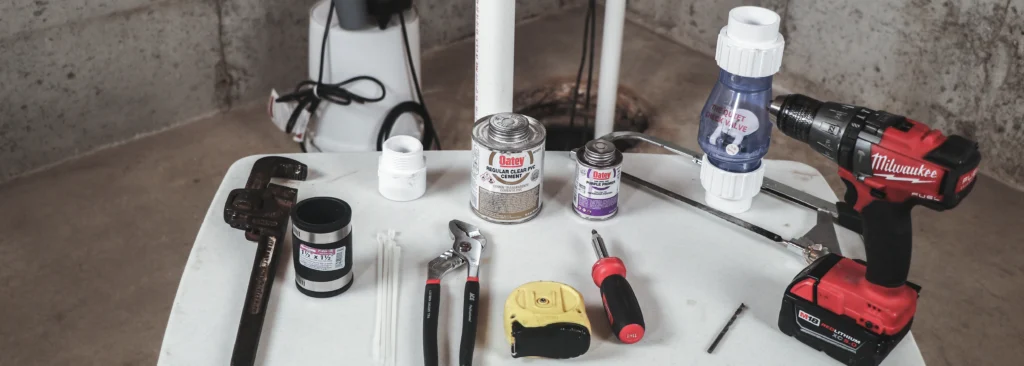
Recommended Tools for Installing a Sump Pump
1 Use a 3/16″ bit drill bit and a bucket shop vacuum (optional for draining water).
2 PVC cement and primer
3 Chainsaw
4 Check valve
5 Pliers with adjustable length
6 Rubber coupling boot
7 Pipe wrench with adjustable end
8 knots with a zip
9 mittens
How to Remove Your Sump Pump
The new pump needs a firm and even base, like bricks or concrete, to thrive. Skip the earth or gravel, as they can lead to wear and tear, making your pump unhappy.
How to Install a Sump Pump
It is now necessary to change your Sump Pump Installation. To make installation simple, watch the video above and follow the instructions below.
1 Attach Check Valve to Discharge Pipe
To ensure that the glue will attach with a strong bond when utilizing a glue-in check valve, prime both the outside edge of the discharge piping and the interior of the fitting first. Before fastening the fitting to the discharge pipe, slip the coupling over the pipework.
Lastly, join the fitting to the discharge pipe by using PVC cement inside the fitting. To lock the fitting in place after you’ve pushed it on, twist it slightly.
2. Take Your Measurements
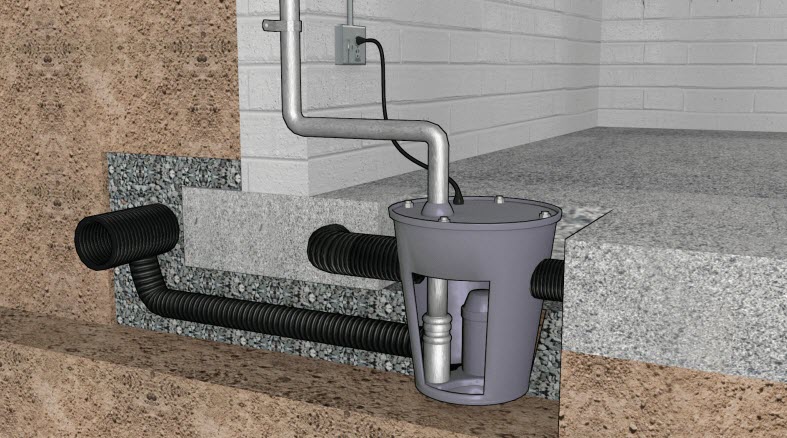
Make sure your pit’s diameter is greater than 14 inches (18 inches is ideal) to prevent your float switch from getting tangled in the piping, pit walls, or pump and perhaps failing to activate the pump.
The pit should be at least 22 inches deep, therefore measure its depth. Next, calculate the distance between the pit’s base and the check valve’s bottom adapter. The next step is to measure the distance from the ground to the discharge pipe threading center of your pump.
*Pro-Tip: To make final cuts and measurements easier, you can use a hacksaw to pre-cut the PVC pipe to a few inches longer than this measurement.
3. Attach Adapter to PVC Pipe
Gluing the male-threaded adaptor to the PVC pipe is the next step. Using PVC cement and primer, first affix the male adaptor to one end of the pipe. After it is connected, use a wrench to fasten the PVC pipe’s adapter end onto the sump pump. Take care not to overtighten as this could cause the fittings to break.
4. Test the Sump Pump & Float
The moment of truth awaits! But before your pump takes its rightful place in the watery depths, it must undergo a trial by water (not fire, thankfully).
A quick pulse check is all it takes. Hear the reassuring whirring? Excellent! Now, onto the next crucial step: drilling that all-important weep hole. Remember, time is of the essence, so keep it brief.
5. Drill the Weep Hole
Don’t skip the weep hole! It might seem small, but this tiny opening plays a big role in preventing air locks that can damage your pump. Think of it as a pressure-relieving valve for a smoother flow.”
Beating the airlock, one hole at a time: Without a weep hole, water trapped below the check valve can create a stubborn air bubble, blocking water from exiting the pump. This weep hole ensures a clear path, keeping your pump running happy and healthy.
6. Cut the PVC Piping
Using the previous measurements, cut the PVC pipe several inches longer than the measured length. Using milk crates or something comparable to raise the pipe off the ground, cut the pipe on an elevated surface.
After cutting, deburr the frayed plastic pieces with a utility knife to smooth out the pipe’s surface and ensure that there is no chance of a leak.
7. Drop the Pump Into the Pit
One last hurdle before your masterpiece is complete! Measuring the discharge pipe is like drawing the battle lines for a perfect fit. Remember the check valve’s bottom center – that’s your target. But don’t forget the cleanup crew – lay down some towels to absorb any water warriors who might stray. And, of course, give the pit a chance to empty its heart before the pump makes its final exit.
With the pipe ready for battle, you’ve conquered the measurement mission! Now, arm yourself with your trusty hacksaw and attack the raised surface with practiced precision. Once that decisive cut is made, the pump can triumphantly reclaim its watery domain, prepped and ready for attachment.
8. Attach Discharge Pipe to Check Valve
Using the same method—primer and PVC cement—attach the coupler to the top of the cut PVC pipe. Before attaching the check valve to the discharge pipe, make sure the adapter for the bottom of the valve is slipped over the coupler.
Then, attach the glued coupler to the pipe align the discharge pipe, and check the valve. Slide the adapter up and hand-tighten the threading to the check valve on the top and bottom. Make sure not to overtighten or else the fittings may crack.
9. Test the Sump Pump Installation System
As the pump roars to life, keep a keen eye on the check valve.
Cheer as water flows through it smoothly, like a champion swimmer gliding through a race.
When the pump takes a break, ensure the check valve closes tightly, sealing off any chance of sneaky water sneaking back in.
10. Secure the Electrical Cords
Now that you’ve installed a replacement sump pump successfully (great work!), you can relax in the knowledge that you completed the task correctly and on your own without the assistance of a plumber. To make sure you never have to worry about your basement flooding again, there are a few more things you can do.
Sump pump alarms are designed to alert you when the water level reaches a specific level or the pump is not able to remove the water quickly enough. They are available in a variety of sizes and designs. You may also upgrade to a smart sump pump alarm, which can deliver notifications straight to your phone wherever you are, providing an additional degree of reassurance.
A battery backup sump pump will come to the rescue when everything else fails. In order to keep up with the floodwaters that are pouring into your basement, they practically quadruple the power of your system in the pit. Some individuals who have experienced floods in the past might even choose for the hassle-free option, which is a combination sump pump system that effectively integrates a backup pump system and primary pump system into one handy package.